Tuesday, June 24, 2008

Golden Acre Food Independence Days Week 8

Mulch Madness
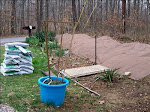
After some much-needed KP in the yard we turned our eyes to the Big Daddy of gardening: mulch. Mulch is our friend. In the front yard where the flower and herb beds are located we’ve mulched twice a year. However, the side yard hasn’t had that luxury, so I spread thin layers of wet newspaper on the ground and covered every bed with a thick layer of peat moss. Then I mulched with pine straw.
Composting: Compost is one of the essential ingredients of gardening. Here at Golden Acre we compost almost everything. So far so good. When I turned compost pile #2 (the older one), it was steaming. I fenced the area with chicken wire to keep out the neighborhood dogs. That will be garden #2. Then we dumped out the rawer compost #1 (revolting) and covered it with manure and clay and dirt and peat moss and newspapers. I was surprised at how much composting had actually taken place in the garbage can (compost #1). Now we’ve started compost #3, which is going to be a second garden bed in the fall.

Birds at the Feeder: Besides the birds already reported, we have a gorgeous red-winged blackbird that lands on our feeder. Different populations and subspecies of Red-winged Blackbirds vary markedly in size and proportions. An experiment was conducted that moved nestlings between populations and found that the chicks grew up to resemble their foster parents. This study indicated that much of the difference seen between populations is the result of the different environments.
The Red-winged Blackbird is a highly polygynous species, with one male having up to 15 different females making nests in his territory. In some populations 90% of territorial males have more than one female. But, from one quarter to up to half of the young in "his" nests do not belong to the territorial male. Instead they have been sired by neighboring males.
The male Red-winged Blackbird fiercely defends his territory during the breeding season. He may spend more than a quarter of all the daylight hours in territory defense. He vigorously keeps all other males out of the territory and defends the nests from predators. He will attack much larger animals, including horses and people. The Red-winged Blackbird forms roosting congregations in all months of the year. In the summer it will roost in small numbers at night in the wetlands where it forages and breeds. In winter, it can form huge congregations of several million birds, which congregate in the evening and spread out each morning. Some may travel as far as 80 km (50 mi) between the roosting and feeding sites. It commonly shares its winter roost with other blackbird species and European Starlings.
http://www.birds.cornell.edu/AllAboutBirds/BirdGuide/Red-winged_Blackbird.html#conservation
Planted: Beans and flower seeds.

Harvested: Our back ½ acre was (once again) covered in the “hay” from cutting. I raked it up and added it to the compost heap. Also harvested basil, Greek oregano, and fennel.

Prepped: To keep the neighborhood dogs out of the compost #2, I fenced it with chicken wire. That’s our prep area for the next two garden beds.

Managed:
Mulched like a crazy woman.
Staked and tied plants. I use panty hose to tie up plants because they stretch and also are full of static.
Turned out the compost from #1 to #2.
Suckered the tomato plants.
The following two sites offer information and diagrams about suckering your tomatoes. Please refer to both sites, since they offer differing opinions. “Knowing the growth habit of the variety you are growing is critical in determining whether a plant can be pruned and the level of pruning.” Plant Doctorhttp://www.nysaes.cornell.edu/pubs/ask/tomato_qa.html
http://www.taunton.com/finegardening/how-to/articles/pruning-tomatoes.aspx
We bought two 9 ft. canvas umbrellas to provide much-needed shade in the garden.
Weeded
Enlarged one of the garden beds.

Stored: Ordered an extra 90-day supply of medications from Canada (at extremely reduced savings). Stored two more gallons of drinking water, 6 quarts of lamp oil, and some canned tomatoes. Froze two quarts of fresh green beans.

Cooked Something New: Ate something new…fiddle head ferns!

Local Food Systems: I checked with the county website and found a recycling center that is very close to our home. I’ve already taken our recycling over there once. Also I located a nearby local farm that sells organic meats, eggs and produce.

Learned Something New: This time of year we’re infested with June bugs. “The beginning of summer is usually marked by the arrival of two noisy and clumsy beetles. Both are called June Bugs but it is easier to give them different names. The June Bug that's familiar to most is the big green kind that can be seen crashing into the side of the house during its uncontrolled flights on hot summer days. The other June Bug is really the May Beetle. This is the smaller brown beetle that is usually crashing into the lights at night during its uncontrolled flights on hot summer nights. They may look different and are active at opposite times but they have similar life cycles and one of them is actually so good to eat that it can "heal what ails ya." And if laughter is the best medicine then the other is useful too.”

Monday, June 16, 2008

Week 7 Food Independence Days

To hear the song about Golden Acre, winner of the 1945 U.S. Victory Garden of the Year award, please click: http://cdbaby.com/cd/wmalanross3.

This week I caught up on the things I neglected in the past six weeks. I spent the entire day with my 14 yo granddaughter; I cooked food for the week, cleaned house, caught up on laundry and email, read a Jodi Picoult novel. In six fast weeks Hub and I have stored enough food, water and emergency supplies to last six or more months, planted a small vegetable garden, cached enough water to irrigate the garden beds, started a composting system, cleared out space for storing supplies, and brought order to our lives in the process. Hub is interested, involved and engaged in the process—this is his first experience at gardening.
Reports from the field: Gas prices in middle Tennessee are at 3.999/10 for regular gas and up to 4.79 for diesel. We’ve saved receipts that reflect the drastic increases in the cost of gas and food. The liquor store owner tells me our favorite Riesling went up $3 per bottle this week. He’s also paying a new $25 delivery charge per order from his supplier due to gas price increases. [That apple jack is soundin’ mitey good.] Our electric usage was up $20 from last month, due to a/c use during this June hot spell. Our auto gas usage was down because we’re consciously making one trip for all errands and to Nashville.

For Food Independence Days course:
Planted: Cilantro, watermelon, transplanted sickly Early Girl tomatoes and sun-burnt ferns.
Harvested: basil, chives, Greek oregano
Prepped: I ordered three books from http://www.half.com/ on making tinctures, salves and other herbal remedies. Kitchen Witchery: Marilyn F. Daniel, Spagyrics: Manfred M. Junius; and The Herbal Home Remedy Book: Joyce A. Wardwell. I plan to buy Everclear to use for tinctures before the prices skyrocket.
Stored: Sometimes it seems dumb to post the things we buy for food storage. Yet my experience has taught me that I can learn a lot from reading posts from other course members. For instance, isn’t it a great idea to store up a little WD40 and 3-in-1 Oil? Prices on those bubbies are bound to go up.
Beef Bouillon x 10 cans
Chicken Bouillon x 10 cans
Tuna packed in water x 25 cans
Canned pears w/o sugar x 10 cans
Canned peaches w/o sugar x 10 cans
Mandarin oranges x 10 cans
Almonds
Cocoa Mix (commercial size) 5#
Baker’s High Protein Flour
Brownie Mix (commercial size) 6#
Soups for bases (celery, mushroom, consommé)
Buttermilk Pancake Mix (commercial size) 10#
Mrs. Butterworth’s syrup (commercial size) 1-gallon
Baking Soda x 8#
Bleach x 1½ gallons
Apple Juice x 4 gallons
Pinto Beans x 20#
Toothpaste x 4 giant tubes (be sure to buy toothpaste with the ADA symbol!)
As you can see, these supplies include comfort foods. Peggy Layton’s plan calls for storing comfort foods.
Water: Our new water catch did well in the rain we (finally) got this weekend. After one rain shower the 110-gallon container was 3/5 full, even though I lost a lot of rainfall because my setup leaked. I’ve since corrected the leak problem. I hope to gather enough water to carry the gardens through the season.
Recycled, Reused: Washed my plastic bags, Ziplocs, etc. in the small delicates tub I have for my washer. Then I hung the bags on my garage clothesline. [We have a clothesline strung in the garage. The clothes dry quickly in the heat and there’s no danger of bird flyovers.] This method worked better than hand washing or dishwasher washing the plastic bags. We have since strung additional clotheslines in our garage [we don’t store the cars in the garage.] I can hang an entire load of clothes on the garage line, still, not fearing bird flyover.
I also raked up grass cuttings. We purposely let our grass grow tall so we can harvest the grass for composting.
As always we composted everything.
Recycled our bottles and plastic to the recycling center.
Used metal cans for energizing in the garden.
Used milk cartons for short-term dry storage of 20# pinto beans.
Taking a cue from Touch the Earth Farms, I run the vacuum less. This cutback presents a difficult situation since we’re allergic to the Himalayan cats we adopted. We have carpets, and the cats are long-haired…that is an issue we aren’t sure how we’ll deal with in the future.


Learned something new
: We have carpenter bees in our deck rails, so I researched them. Keep in mind as you read that our deck is made of pre-treated lumber and we sealed it twice last year. “Carpenter bees tunnel into wood to lay their eggs. Bare, unpainted or weathered softwoods are preferred—especially redwood, cedar, cypress and pine. Painted or pressure-treated wood is much less susceptible to attack. Common nesting sites include eaves, window trim, siding, wooden shakes, decks and outdoor furniture. Carpenter bees overwinter as adults in wood within abandoned nest tunnels. They emerge in the spring, usually in April or May. After mating, the fertilized females excavate tunnels in wood and lay their eggs within a series of small cells. The cells are provisioned with a ball of pollen on which the larvae feed, emerging as adults in late summer. The entrance hole and tunnels are perfectly round and about the diameter of your finger. Coarse sawdust the color of fresh cut wood will often be present beneath the entry hole, and burrowing sounds may be heard from within the wood. Female carpenter bees may excavate new tunnels for egglaying, or enlarge and reuse old ones. The extent of damage to wood which has been utilized for nesting year after year may be considerable. Mechanical Measures. A non-insecticidal management approach is to deny carpenter bees access to their galleries by sealing each entrance hole. Thoroughly plug the hole with caulking compound, wood putty, or a wooden dowel affixed with wood glue. If possible, also fill the entire gallery system with a sealant. Carpenter bee galleries are a critical resource, since the bees spend much of their time inside a gallery, and they require its protective conditions to survive the winter. Bees that are trapped inside a caulked gallery typically will not chew out due to behavioral constraints. This barrier approach has promise for reducing future carpenter bee infestations.”
Local Systems: I found a local store that orders and sells bulk foods. I meet with them on Monday. We bought from them last year—their hens laid the greatest eggs—but the night before the county fair a critter got to the chickens and killed them all. Since then the store hasn’t had fresh eggs, so we shopped at Farmer’s Market instead. Also, taking Sharon’s sage advice [to mulch] to heart, I found a local supplier who delivers mulch for a reasonable price. I’m going to lay down heavy mulch on next year’s proposed garden plots. I’m also going to try to borrow my friend’s chickens for the day to grub the garden. If we had the back ½ fenced I’d get a few chickens just so they could prep for next year.
Birds at the feeders: Cardinal, Goldfinch, House finch, one bluebird, hummers, doves, grackles, chickadees.

Food Prices: (This is a good time to have a garden!)
In 2007 and early 2008, prices of wheat, corn, rice and soybeans, among other crops, have escalated along with energy and other natural resources. Since the start of 2007, wheat futures are up 69%, soybeans have risen 92%, corn is up 49% and rice is up 131% on the Chicago Board of Trade. http://scienceblogs.com/corpuscallosum/2008/06/the_us_government_has_zero_gra.php Freedom Foxfire Notebooks: I have two [so far] three-ring notebooks I started for the Food Independence Days course that includes classes on how to make cheese, candles, grow mushrooms, make soaps, yogurt and salves. I’m now on Book Two of my series. [Verde, thank you for that most excellent cheese course site!] The great thing about internet is the illustrations, so I have compiled an illustrated guide to a simpler life.

Tuesday, June 10, 2008

Week 6 Golden Acre Update

This past week has been non-stop work. With temps in the 90s and a blazing sun, I feel I’ve gotten a thorough workout. Most days I spent in the garden and did very little housework or cooking. Hub has been a champ. Although he’s on the IR, he patiently stood at the sink and washed dishes every day. All hail the Hub!


Total Success!I have one itty bitty green tomato. It may never make it to maturity, but I’m happy to see its little face. This is one of four Early Girl tomatoes I rescued from the burnt up and dead plant section.

This week I built a “Square Foot Garden.” Mine is 8'x3'. I covered the ground with thick cardboard, then weed cloth. I layered the bed with compost, vermiculite, peat moss, compost. I put the soaker hose between layers. I’ve used white wooden fence for grids and support. The peas are covered with shade cloth because our temps are still in the 90s. I’ve had to cover several plants, including the pumpkins. We lost a couple of flowers on the pumpkin vines due to the heat.


The clover patch. We don’t have a lot of bees in our area, so this year we let a 5’x5’ section of back yard, formerly a meadow, grow wild and free. We wanted to use the naturally occurring clover to attract honey bees. I read that bee larvae feed on clover. Now that the clover is full of blooms we have bees every day. We’ll let a few more trimmed clover patches grow wild. That will cut down on mowing and provide habitat for insects and food for bees and butterflies. We haven’t mapped out the lower ½ acre yet, and that’s going to have to go high on the list so we end up with a plan.

Harvested: We finally cut the chives. Next time I’ll cut them sooner; some of the stems are tough. I read in Wikipedia that: “Albeit repulsive to insects in general, due to its sulfur compounds, its flowers are attractive to bees, and it is sometimes kept to increase desired insect life.”


Stored:
25 lbs white sugar
2 bottles Excedrin Migraine
6 bottles of propane for the camping equipment
4 gallons of water (I use baking soda and water to clean the bottles and lids, and then pour in filtered water and a few drops of bleach according to instructions. These containers are stored indoors in an air conditioned dark closet for maximum mileage.)
Froze a quart of cherries and two quarts of raspberries.

Water Storage: In an article on the Walton Feed site, Vicki Tate writes, “Fourteen gallons of water per person is the suggested amount to store for a two-week emergency situation.” That’s a gallon a day minimum per person for simple existence. Hub and I have stored, so far, only 11 gallons of water. That’s enough for five days each. We’ve started purifying and storing two or three two-liter bottles of water per week. Our new water catch tank is a 110 gallon capacity recycled container which we had professionally cleaned. The tank is safe for human drinking water; still, our current plan is to use it to water the gardens. If we get sufficient rainfall to fill the tank, this system could also store bath and laundry water for us to use in case of emergency.
Recycled/Reused:
· Cleaned out my bedroom closet and recycled shoes to the mission, made room to store the winter coats. My sister, Kathy, says hang lavender sachets in the closets to repel moths. I’ve found that small #2 cones coffee filters work well as sachets, and that helps me use up the coffee filters I bought in the wrong size.
· Recycled all cardboard by using it to build more square foot beds in the side yard. Recycled juice and soda bottles for water storage.
· Composted almost everything (no kitty litter)
· Took reusable bags with us everywhere
· Saved cans for candle making
· One of my sons moved Hub’s book samples to my bedroom closet so we could have another closet for storage.

Prepped: I used my car to dry the chives. I put parchment paper on a baking tin, put the chives on the paper, and covered them with a cotton tea towel. Then I put the whole contraption in Hub’s car. The chives dried fast, and got to ride around with my husband who had no idea why I had put onions in his car.

Cooked something new: I found a brand new Terra Cotta Baker on ebay for less than half price. I baked two loaves of no-knead bread. The crust is crackly, the crumb is loose and the taste is delicious. Very yeasty smell and flavor. I didn’t get the lift I wanted because I’m using cheap flour, not bread flour. Cheap flour doesn’t have much protein so it doesn’t give good rise. I also could’ve given the yeast another few hours to ferment but the dough looked great. I don’t use the bread machine to make this bread so we’ve cut out another small appliance.
Recipe #1 was 2c white flour, 1 c organic whole wheat flour, 1 ½ c water, ¼ tsp ACTIVE DRY YEAST (I didn’t have any instant yeast), 2 ½ tsp salt.
Recipe #2 was a no-go.
Recipe #3 was 3c white flour, I cup beer, 1/2c water, 1 ¼ Tbl white vinegar, 2 ½ Tbl sugar,1 ¾ tsp salt.


Contribute to local systems: We bought Hatcher Dairy milk.


~~~~~~~~~~~~~~~~~~~~~~~~~~~~~~~~~~~~~~~~~~~~~~~~~~~~~~~~~~~~~~~~~~~~~~

Sprouts Jar Method http://www.btinternet.com/~bury_rd/sprout.htm
I ordered two sprouting lids from Wheatgrass Kits.com. http://www.wheatgrasskits.com/sprouting/sprout_lid.htm
Sprout Jar Lids "Jar Method" Sprouting Instructions
· For a quart-sized jar, start with 1 1/2 tablespoons seeds inside the jar, screw on the fine mesh sprouting lid and partially fill the jar through the sprout jar lids with warm water, not hot. Swirl it around to clean the seeds, then pour out. Refill with warm water to cover at about 3 times their depth & let soak overnight, away from light. This gets the germination process started.

· Pour off the soak water. Find a location that is not exposed to direct sunlight. Place drained jar propped at an angle to allow any extra water to drain out. Turn the jar to spread out the seed. Cover the jar with the sprout jar lids and a dishtowel and leave for 3 to 4 hours.

· Rinse sprouts with cool, fresh water 2 or 3 times each day until they are ready to eat or refrigerate. When they begin to throw off the seed hulls, let the jar with sprout jar lids installed overflow with the water and the hulls will float out the top through the sprouting lid screen. Turn the jar to spread out the seed each time you rinse.

· Pour the sprouts into a pan or sink of clean water. Skim off any remaining hulls that float to the surface. Other hulls will fall to the bottom of the container. Pull out the sprouts, gently shake off excess moisture and drain in a colander.

· Clean the jar and sprout jar lid. Place sprouts for greening back into the jar. Place in indirect sunlight. Near a kitchen window is fine. After the sprouts have greened with chlorophyll and carotene for a day or so, rinse, drain with sprouting lids & eat or refrigerate.
· Sprouts will stay fresh & hearty for a week or more when refrigerated, if you rinse them every day or two. You can even give the green sprouts an extra hour of sunlight after rinsing to keep them at their nutritional peak. Caution: Since sprouts are frost sensitive, don't place sprouts near the freezer compartment.
~~~~~~~~~~~~~~~~~~~~~~~~~~~~~~~~~~~~~~~~~~~~~~~~~~~~~~~~~~~~~~~~~~~~

Bean Recipes
Hoppin John
Ingredients
1 cup small dried beans such as cowpeas or black-eyes5 to 6 cups water1 dried hot pepper (optional) 1 smoked ham hock1 medium onion, chopped (about 3/4 cup) 1 cup long-grain white rice
Preparation
Wash and sort the peas. Place them in a saucepan, add the water, and discard any peas that float. Gently boil the peas with the pepper, ham hock, and onion, uncovered, until tender but not mushy — about 1 1/2 hours — or until 2 cups of liquid remain. Add the rice to the pot, cover, and simmer over low heat for about 20 minutes, never lifting the lid.
Remove from the heat and allow to steam, still covered, for another 10 minutes. Remove the cover, fluff with a fork, and serve immediately.
In Cuba, this versatile side dish is known as congrí. Louisiana has its own version of red beans and rice, of course, but in that one you won’t find the oregano, cumin or cilantro.
Servings: Makes 6 servings.

Red Beans and Rice
Ingredients
Beans1 cup dried small red kidney beans2 quarts water1/2 small onion1 2-inch square of red bell pepper2 garlic cloves, peeled2 fresh cilantro sprigs1/2 teaspoon ground cumin
Rice1 1/2 cups long-grain white rice, rinsed in cold water 5 times
3 tablespoons olive oil2 cups chopped onions1/4 cup chopped red bell pepper2 garlic cloves, minced1/2 teaspoon ground cumin1/2 teaspoon dried oregano
Preparation
For beans: Soak kidney beans in large bowl with enough cold water to cover by 3 inches, at least 4 hours or overnight. Drain in a colander and keep wet until the bean hulls crack open (or even sprout). Place 2 quarts water, beans and next 5 ingredients in large pot. Bring to boil over medium-high heat. Reduce heat to medium, cover and simmer until beans are tender, stirring occasionally, about 50 minutes. Season to taste with salt. Drain, reserving beans and bean cooking liquid separately. Discard vegetables and cilantro.
For rice: Bring 3 cups bean cooking liquid to boil in heavy medium saucepan. Add rice; bring to boil. Reduce heat to medium-low, cover and simmer until almost all liquid is absorbed, about 20 minutes. Uncover; fluff with fork.
Heat oil in heavy large skillet over medium-high heat. Add onions, bell pepper, garlic, cumin and oregano and sauté until onions are beginning to brown, about 5 minutes. Stir in beans and rice; cook until heated through, about 5 minutes. Season with salt and pepper.

Cuban Black Beans and Rice
This is also a great vegetarian entrée.
Servings: Serves 4 to 6.
Ingredients
1 15-ounce can black beans, rinsed, drained1/2 large red onion, very thinly sliced2 tablespoons balsamic vinegar*
1 tablespoon olive oil1 white onion, finely chopped4 large garlic cloves, chopped1 cup Arborio rice*3 1/2 cups canned unsalted chicken broth1/2 cup dry white wine2 large bay leaves1/2 teaspoon turmeric1/8 teaspoon (or more) cayenne pepper
* Balsamic vinegar and Arborio rice are available at specialty foods stores, Italian markets and some supermarkets.
Preparation
Combine first 3 ingredients in medium bowl. Let stand 30 minutes, stirring occasionally. Season with salt and pepper.
Meanwhile, heat oil in heavy medium saucepan over high heat. Add onion and garlic and sauté until translucent, about 5 minutes. Add rice and stir 1 minute to coat with onion mixture. Add broth, wine, bay leaves, turmeric and cayenne pepper and blend well. Bring mixture to boil; stir well. Reduce heat to medium and simmer until rice is tender and mixture is creamy, stirring occasionally, about 25 minutes. Season to taste with salt, pepper and cayenne.
Spoon rice onto platter. Arrange beans and onion garnish alongside.
Suitable accompaniments to this risotto-like dish are crusty bread, an avocado and orange salad with a cilantro vinaigrette and, to top it off, coconut pie.
Servings: Serves 2.


West Indian Rice and Beans
Ingredients
2 1/2 cups (about) canned vegetable broth1 15- to 16-ounce can kidney beans, drained1 cup canned unsweetened regular or light coconut milk1 tablespoon minced seeded jalapeño chili1 teaspoon dried thyme1/4 teaspoon ground allspice3/4 cup medium-grain white rice
1 cup thinly sliced green onions
Preparation
Combine 2 cups vegetable broth, kidney beans, coconut milk, minced jalapeño chili, thyme and allspice in heavy large saucepan. Bring mixture to boil over medium-high heat. Stir in rice. Reduce heat to medium-low and simmer mixture uncovered until most of liquid is absorbed and rice is almost tender, stirring often, about 20 minutes.
Mix 3/4 cup green onions into rice. Continue to simmer until rice is very tender and mixture is creamy, adding more broth by 1/4 cupfuls if mixture seems dry, about 5 minutes longer. Season to taste with salt and pepper. Transfer to serving bowl. Sprinkle with remaining 1/4 cup green onions and serve.


Monday, June 2, 2008

Food Challenge Week 5


Our Golden Acre Update


Planted:
· Red clay gardening is the pits. While the clay is full of nutrients (and wiggler worms), getting the soil to release the goods is the trick. In our courtyard we dug up the weeds along the path we wanted to create, then we put down a thick layer of coarse sand. After we spent some time walking on it and the rain beat on it, the sand and clay hardened into a nice little woodland path. We’ve tilled and amended the courtyard soil along the ugly fence and planted peas, mammoth sunflowers, morning glories and two hills of pumpkins and zucchini. Most of the peas are weak looking, yet the morning glories seem to thrive in the soil. I planted a bush tomato in a giant tub, along with some purple basil.


“Attraction” Dwarf Butterfly Bush


Harvested:
· The chive blooms are fading and I was going to harvest the chives, but I saw tiny bees on the flowers and thought I might just let them go another few days. Some of the women in my group dry herbs and foods in their cars. I live in the humid south in the US. I’ll give it a shot.

Managed:
· Finished (YEA!) cleaning out, repackaging, bay-leafing, and labeling the pantry. Setting up a place to keep your stored foods is the first step. I composted the old pantry stuff. Then I made a handwritten inventory, and I have to say I was shocked at how little we have. I have two large coop orders placed, but I don’t expect them for another month or more, due to backlog. Still, the pantry space is ready and labeled and waiting…and empty. Although you can’t see the top of the pantry, you get the idea. It’s a big dark closet with the door cut shorter for ventilation. On the right and left sides are deep storage spaces. I’ve mapped the layout, which we’ll post to the inside door. There’s plenty of room for storing food.


Prepped:
· Water storage: We bought a 300-gallon agricultural water tank in a cage. We’ve been waiting all weekend for the guy to deliver it to us. Can’t complain when he’s doing the driving, but it’s been raining all weekend, and I keep thinking of the water I’d be catching if I had the storage in place. Since we live in a drought zone there’s no way can I have a garden without big water catch in place.


· Composting: I added another three buckets of compost to the teeny tiny garden. Since we have red clay soil and our compost is aged well, we can add as much compost as we want without fear of burning the plants. Also we’re planning for a fall garden, and because of the red clay a lot of prep has to happen. We’re prepping two areas for blackberries using the lasagna method in raised beds.


Pumpkin and Cantaloupe Hills


Stored:
· I put everything that passed inspection into the pantry in jars with basil leaves. I finished drying the bushel of mint for winter tea, and I explained how to dry herbs to one of my sons. I stored a 1-1/2 gallons of bleach. Meanwhile I’m been freezing the rice in Pepsi 2-liter bottles. Rice doesn’t keep well, according to Peggy Layton.

Learned:
· It takes a lot more food and water than I expected to feed two people for three months. With my coop order I’ll still be short 3 gallons of fruits and 3 gallons of vegetables. And that’s only for a three-month supply!
· There are so many great videos on YouTube. Here are a few videos on homesteading that I got hints from.
http://youtube.com/watch?v=ZOaPFt_ajvU&feature=related
http://youtube.com/watch?v=mWjCnwbb5yc&feature=related

Cooked Something New: Mixed up a batch of the No Knead bread (recipe below).

Local Systems:
· We got to Farmer’s Market in our small town but the farmers had gone home. They’d sold out. So we plan to drive up to Mamushi Farms to pick some produce. They even have worms…for the soil, not canning.
Independence